Phi_prompt new version soon

I am revising phi_prompt library to hopefully make the following features available in the next release, two days from now:

  1. Support 20X4 character screen with more flexible “2X2” list mode so you can list M columns by N rows with X  characters per row, all M, N, and X are your choice (Done)
  2. List your “2X2” list anywhere on a larger screen instead of the basic 16X2 screen (Done)
  3. Easy to call “YES/NO” dialog.(Planning)
  4. Easy to display “YES/NO”, “HIGH/LOW” options for numerical inputs so you don’t have to construct a list and do it the list way.(Planning)
  5. Add scrolling texts that scrolls to fit in smaller space (Done)
  6. Add floating point number input (Done)
  7. Add event function so each time the user changes a number, a function is called to update operations (planning)
  8. Add dialog functions to make a dialog. This function creates a complete dialog with various controls and the user uses left and right keys to navigate among the controls and change their values. It is going to look like a dialog on your computer. You make some choices and push yes. (planning)

Check back in a couple of days!

Here is a teaser:

Phi-connect is available

After some long planning, prototyping and production, the phi-connect system is available for sale. This is a big time saver and headache remover for arduino users. Connect and disconnect your arduino from a project and switch to a different project in seconds. Please check out its own blog page for more details.

Picture:

Here is the list of online stores that sell the kits:

www.inmojo.com

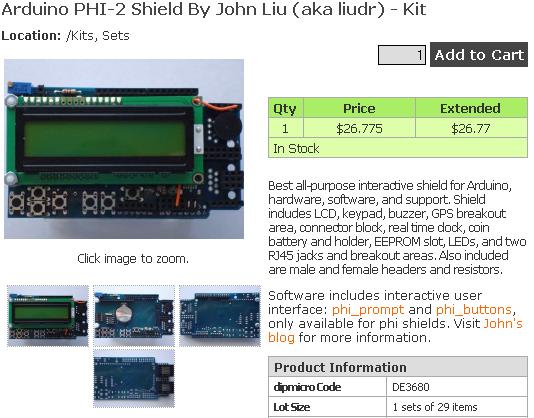
Phi-2 shields available at dipmicro.com

Phi-2 shields are available at dipmicro.com now. They are also available at the open source hardware place inmojo.com as well. You are welcome to visit both places!

Here is a dipmicro.com coupon SPRING10

Phi big fonts available as a library

After some initial success, I made some major upgrading, the phi_big_font has rolled out of the “Liudr factory”

Here is how big they look, on a 20X4 screen, showing both regular and inverted fonts.

Details are in the phi_big_font library page.

A video:

Organize your code – big ASCII art font

I have written several post on how to optimize your code, specifically optimizing memory usage, and keep them in separate tabs to organize a longer project. This time it is a trick I do (didn’t see anyone else I know do this yet). In Arduino, you can create block comments as the following:

/*

All is comment

blah….

*/

So besides using these block comments to document how to call a function you wrote or how to configure a library or else you can also do the following:

/*
.___  ___.  _______ .__   __.  __    __
|   \/   | |   ____||  \ |  | |  |  |  |
|  \  /  | |  |__   |   \|  | |  |  |  |
|  |\/|  | |   __|  |  . `  | |  |  |  |
|  |  |  | |  |____ |  |\   | |  `--'  |
|__|  |__| |_______||__| \__|  \______/
*/

Pretty cool, right? It clearly indicates the content after this comment has something to do with menu. If you scroll through your hundreds of lines of code, this will catch your eyes much easier than any comments. Although some programmers use a row of # or – to separate codes, this is better. you can have all of these elements together to improve the overall readability of your code:

/*
########################################
.___  ___.  _______ .__   __.  __    __
|   \/   | |   ____||  \ |  | |  |  |  |
|  \  /  | |  |__   |   \|  | |  |  |  |
|  |\/|  | |   __|  |  . `  | |  |  |  |
|  |  |  | |  |____ |  |\   | |  `--'  |
|__|  |__| |_______||__| \__|  \______/
########################################
Menu functions go here!
*/

Here is where I found this starwars font:

http://www.network-science.de/ascii/

Just scroll down the font list and find your favorite!

To read all my posts on coding, press the “coding” button on my blog.

Oh here, someone made a movie with ascii art:

http://www.asciimation.co.nz/

Morse code translator new version

This version is completely rewritten with the Phi-prompt interface for Phi-2 shields. Should be easy to use on Phi-1 shields by changing the #define phi_1_shield in main program.

The new program is easier to understand, and has a new library feature. Right now I have about 12 short words in the library. You can just browse the library of words and press confirm or right to play the Morse code for that word. It’s handy for training so you don’t have to enter it in painstakingly. Change the words anyway you want. They don’t have to be 7 letters long. The list can only fit 7 characters.

Here is a video:

Download:

->code<- This library includes the above example’s code, which requires phi_prompt and phi_buttons libraries.

The newest edition is based on phi_morse library now and is totally easy to use. I will upload as soon as possible.

Phi-connect is coming soon!

After some long wait, I was assured that the phi-connect has been manufactured and shipped. Here’s pictures supplied by the manufacturer, not the best, but at least something is better than nothing.

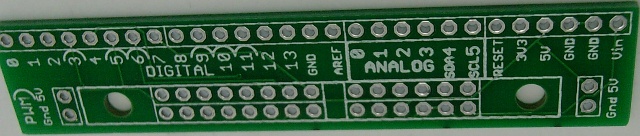
This will go on the Arduino:

This goes on the breadboard or you can solder on it for your permanent installation.

You can see everything is marked clearly enough. I don’t have space to mark PWM pins as “PWM” so I got a little creative and used a “)” on each pin that is a PWM. There is also a legend “PWM)”, which reminds you the “)” pins can do PWM.

As you can see, there are two places on the small board with 5V and gnd. Yes, if you solder pins on them, you can plug them directly in the power buses on your breadboard! They also improve the mechanical strength of the board.

I will make an announcement once they reach the online stores ready for grabs. Besides, I’m stilling looking for picture exchanges. If you have a messy project with crazy wires on your board, send me a pic. I can send you the phi-connect in exchange for a couple of pictures of well-organized project with the help of phi-connect. The amount of this exchange is limited so leave a message if you want the exchange.


Persistence of vision – 2 principles and how to build

After the initial success with persistence of vision or POV, I made a PCB just to do the job. Please look at the middle of this page for some details:

->My gadgets page<-

Principle of operation:

How does the POV tell its speed and when to start displaying?

There is a sensor (typically Hall Effect magnetic switch or photogate) on the rotating board to sense where to start displaying. You have to display the same message at the same spot several times a second to get persistence of vision. Speed of the rotation is calculated by the rotating board, using time difference between two subsequent sensor readings. It’s like if there was 250 ms of time between subsequent triggers from the sensor, the speed is 1/250ms=4Rev/s

How does the POV display numbers and letters?

If you have recently made some purchase, bring out your receipt. You may notice that some of your receipts look rougher than others, seemingly made up of dots:

The left receipt shows characters made up of 5*7 dot matrix while the right receipt shows smooth characters (maybe the dots are too small to see).

What happens inside of the printer that produces the left receipt was that there is an ink ribbon placed in front of the blank receipt and a column of 7 pins is brought near the ribbon. The 7 pins can move quickly in and out. When a pin moves in it presses the ink ribbon against the blank receipt, making a dot on the receipt. When it pin moves out of the place, the ink ribbon is not pressed against the blank receipt. If you look at the capital T on line one, the pins are controlled by a microcontroller which tells the top pin to punch, then moves the pins one space to the right, top pin to punch, move to the right, tells all pins to punch, move to the right, tell top pin to punch, move to the right, tell top pin to punch. This way a “T” is made with two single dots on the top, seven dots in a column, two more single dots on the top again.

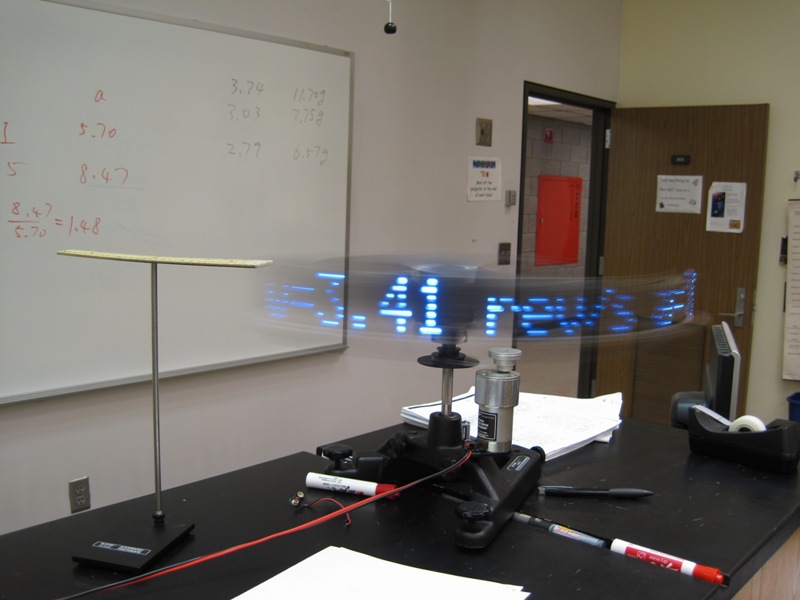
This way, a single column of pins makes characters, then characters make words, and then sentences. A persistence of vision display follows the same principle with a single column of LEDs “printing” in air. When the rotation is fast enough, at least around 2RPM, then the repeated information results in persistence of vision in human brains and the images magically appear. If I lived in the “Terminator” time, I would use such a display, not a dog, to tell who’s human who’s not. If you ever construct such a display, try taking a picture of what’s said, you’ll find it hard but still possible to take a picture of the complete message.

Here is another picture of my POV display acting as a clock:

Essentially you can display any message on the display you want, besides characters and numbers, as long as you use several columns of 8 vertical dots to represent them.

How the electronics works

I am using an Arduino to control the POV display that I made from 8 LEDs and a 74HC595 shift register, and a Hall Effect switch. The Arduino senses the rotation from the Hall Effect switch passing underneath a magnet (see there’s a ruler in the picture stuck on top of a poll?). Once sensed, it spits out the information to be displayed in columns of LEDs to the shift register. With a shift register, you can expand the number of LEDs to a number larger than the number of Arduino pins, without increasing the number of pins needed to control them. You only need 3 pins to control a series of shift registers, which translates to dozens of LEDs.

Here is a good tutorial on Arduino website to learn shift registers:

http://www.arduino.cc/en/Tutorial/ShiftOut

The arduino turns on the appropriate LEDs representing the first column of a character and waits for a short period of time, say 1ms, then it changes the LEDs to represent the next column, and wait and next.

How to make this display

List of hardware:

You will need the following parts in order to make the display:

One reliable rotation stage such as a computer case fan or my fancy Pasco rotation stage (improper assembly may result in injuries so do it carefully and don’t sue me)

One Arduino board (UNO or RBBB with a tiny breadboard)

One 74HC595 shift register

Eight bright LEDs

Eight appropriate resistors, when unsure, use 220 Ohm

9V battery and clip

One Hall Effect switch

One magnet

One perf board or the POV breakout board(see the middle of the page)

Some wires and headers

Assemble the hardware:

First solder the parts together indicated below. If you use a perf board, situate your 595 in the middle with the pins that are connected to their neighbors. You need to spread out the LEDs. You’re much better off using the breakout board. Make sure you observe polarity of the LED, long leg is positive.

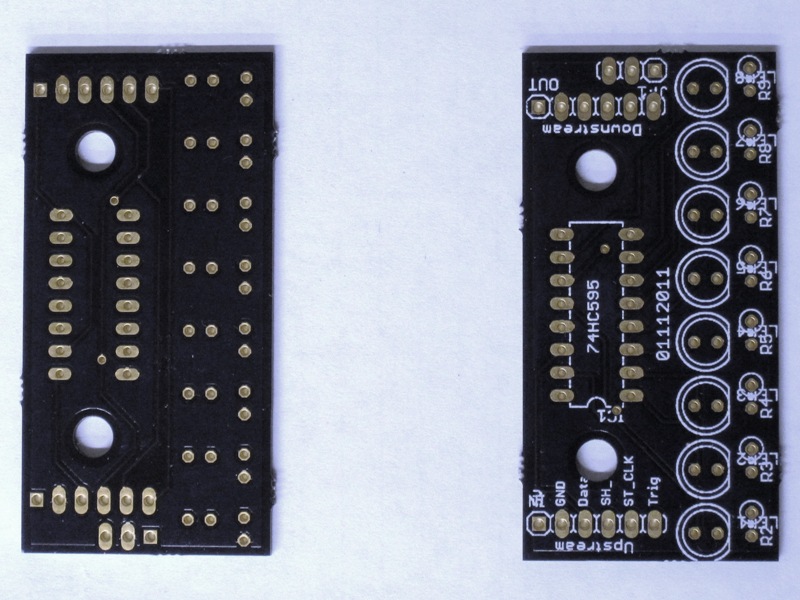
Here is the breakout board:

Notice the circles (LED) have cuts that you can see on your LEDs to match. The IC spot also has a half circle notch to indicate orientation of the 595.

Here is when everything is soldered on:

To solder on the Hall effect sensor, face the narrow face of the censor away from the board and insert it into the 3-pin spot and solder. The bend the pins zig-zag so the sensor is further lifted up to sense a magnet.

Power the thing with 5V and GND indicated on the board and measure the output of the trig pin. Make sure you get the right magnetic poll to trigger the switch. It stays high until the correct magnetic poll is brought near enough to it. Once tested, secure the magnet on something that will hang directly above the sensor.

To test the LEDs, use the sample code from the Arduino tutorial:

http://www.arduino.cc/en/Tutorial/ShiftOut

If everything works, load the following code. Before you rotate your stage, you need to be sure everything is secured. Power Arduino with the 9V battery at Vin (positive) and GND pins. Turn on your rotation to at least 3RPM. Darken your room if possible.

To be continued…

Load the software to Arduino:

To be continued…

Big font

This is another inspiration I drew from the Arduino forum and sparkfun’s contest on instructables.com a while ago:
I’ve seen several examples of using “Big numbers” to display time on a 16X2 character display.
I’ve seen JO3RI doing animations on a 16X2 character display.
So I asked myself, why can’t someone come up with a way to double up the size of the 16X2 character display, not just ten numbers, but all alphabets, then it’d be useful as a larger display! Time, Speed, Direction, etc.
I’ve brewed this for a while (between last night and this morning), tada!

You can see that I intentionally scaled my images down so small that it would hurt to read the standard size fonts (click to zoom) but the large font is just fine. I made an estimate with it. I can read the clock from about 4 meters (13ft) away just fine, while the standard text is visible less than half that distance away.


The entire thing is for now resident in SRAM (please don’t blame me. I’ve been on this since lunch. I need a break, critic and encouragement before I squeeze memory)

Everything has been integrated smoothly in my phi-menu system now.

If you just want these large fonts, take the following code, but if you want all the interactive features, you need the phi-menu.

Nutshell version code

Full version code (up soon)

Password panel

Password panel for Arduino Phi-1 shield

introduction:

I have been thinking about this for a while: an arduino password input panel. You will be prompted to enter a password, you have three trials. If you pass, something happens, if you fail, something else happens. You decide!

After I recently pre-released the phi-menu, a versatile arduino shell for interacting with users and building menus, I realized I could make the password panel very easily with ph1-menu.

The project simply calls input_panel2() to get a string from the user, 6 digits long, ‘0’ to ‘9’ (you can change this yourself). Then it compares the user input with the stored password. If it is correct, it returns true and prints some good texts. If it is incorrect, the user is given more trials until the trials run out and some not so good texts are shown.

A second part of the project is a function that updates the password to different numbers and updates number of trials a user can have. This part, ideally only gets called after authentication, will be a part that you can offer to authenticated users. I’m just having it here as a demonstration of how easy it is to make something out of phi-menu.

Here is a video:

Here is the code:

Full version with Phi-menu

Nutshell version (password is, well, read my code!)

About phi-menu

Please refer to the phi-menu page for all the details